Thursday, November 30, 2017

Shopping.....

 As I have stated previously...when I can't craft I shop....planning for when I will have time to craft!  I have been doing a few odds and ends projects, but I haven't had a ton of time to spend making cards and full projects.  Lots of times when I have a few minutes to spend in my studio I will make pieces for cards and stock pile them for when I can spend more time in my studio.

I used to work and shop at a local scrapbook store and now that it is gone I get a lot of my supplies on line, the only store really close to me is Michael's and most times they just don't have what I am looking for.

So here are some of my shopping hauls and my Birthday haul from a couple of months back :)

The first picture is my order of goodies from Simon Says Stamp, I got this in the spring and have tried many of the products in here.  I love the new distress oxide inks and would love to get more of these. I have also been trying out the Zig Clean Color Real Brush watercolor markers.

Urban Source is a local store over in Vancouver that I love to shop at when I get the chance.  I can't get there as often as I like, but I always stock up when I do.  This is a great place to go for all kinds of treasures.
This is my Birthday haul of goodies,  so many fun items in here...I really should have taken some better pictures of the goodies in here.  So many projects I want to try with these products.
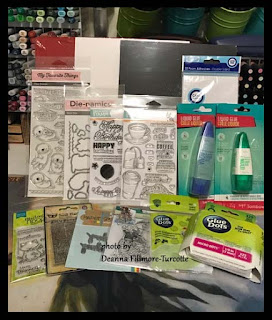
This is just a mini haul I did in October because I saw a couple of stamp sets I wanted to use for 
Christmas cards. I hope to actually have time to make cards with them.  Also SSS sent me a free gift code with my previous order and the die and paper smooches stamp set were the free gift & the Kitty Cat is just always on my desk (she has to be everywhere I am).  Seriously, she is sitting in that same spot as I type this post 😊
A few weeks ago my husband bought me a bunch of crafting supplies.  I had to break the pictures up for this haul...I couldn't fit the stuff all in one picture (at least not so you would be able to tell what was in there)
 SSS sent me another free gift code and I got the die and stamp set that are in the above photo!  Finally got my hands on the Misti Creative Corners and stocked up on some card stock and foam tape.  The bottom two photos are the other goodies from I got in this haul.

Last, but not least...a wonderful belated birthday present from my brother & sister in law.  These watercolor sets are beautiful and I can't wait to try them & the stamp set is so cute.
  
There just aren't enough hours in the day!!! Can't wait to get some more time in my studio!!!

Thanks for stopping by
Happy Crafting Everyone!
Deanna

Tuesday, April 11, 2017

Two Challenges in One!

I'm so enjoying spending more time in my craft room and getting back to doing some challenges.  I didn't have enough time to do two different projects for the 2 challenges due by Wednesday, so I decided to combine them.  Simon Says Wednesday Challenge this week is a "Birthday" themed project and the Kraftin' Kimmie Wednesday challenge is "anything goes"

For this project I decided to grab one of my favorite Kraftin' Kimmie stamps "Alice" and create a birthday card.  I stamped the image with Tuxedo Black Memento ink and colored it with copics (B0000, B000, Boo, Bo1, B02, B05, Y21, Y23, Y26, E0000, E00, E01, E02, R02 & N7) & added a little shimmer with a "sky star" gelly roll pen. 

I masked off the image and created the back ground clouds with a plastic template (handmade) and some tumbled glass distress ink sponged on.  It is really hard to tell in the picture but both white background pieces have the clouds on them.  I added some diamond stickles to the sponged clouds in the background. For the die cut clouds I used the Simon Says Cloud die and cut them up.  

The greeting is from the Simon Says Birthday Balloons stamp set (MFT hybrid ink pad - steel grey). I liked that the curve of the stamp, it seemed to match the curve in the clouds (although it isn't easy to tell that from the picture).  Finished it off with a few plain rhinestones in the corners and one on her hair bow.

Well, I think I covered everything I used for this card.  I'm sure I will come back and edit this post at least twice.  Once again I am typing this out after midnight which usually means I ramble and make many errors 😏

Thanks for stopping by!
Deanna

Monday, April 10, 2017

Make A Rainbow!

This project almost didn't get finished in time!!!  As I type there are about 4 hours or so left to post this.  This project I created for the Simon Says Monday Challenge "Make A Rainbow".  They design team made so many beautiful project this week that you couldn't help but be inspired!

This is what I came up with after looking at all their wonderful samples.  Of course I now have to go out and buy the correct size frame for it.  I put it in a slightly bigger one just to see how it will look, but I really need to get the proper size.

For the  background piece - I followed the instructions I found on AmyR's blog - click here for post! The Tim Holtz distress inks I used were - black soot, mustard seed, wilted violet & blueprint sketch and copic opaque white paint.
The buildings I cut out with "cityscape nightline"die from Memory Box and the other buildings are using another die (unfortunately I can't find the package to tell you the name of it).  I used Tim Holtz distress inks to water color these (tumbled glass, festive berries, peeled paint, squeezed lemonade, broken china, carved pumpkin, ripe persimmon, candied apple, twisted citron, mustard seed & wilted violet).  I just stamped some of each ink on a plastic palette and spritzed it with lots of water and used an aqua brush to paint them.  The buildings are attached to the background piece with glue dots.

For the moon I just cut out a circle and sponged it with a bit of brilliance moonlight white ink and a bit of the mustard seed ink edged on one side.  I then used the "peeled paint" stamp by Prima to stamp the texture on with the black soot ink.  It is attached to the background piece with foam squares.

I'm pretty happy with how it turned out for my first attempt at the background.  I love making these 3D art pieces and wish I had a proper size frame to put it in right now. Oh well, it gives me a good excuse to go shopping later this week. 😀

Thanks for stopping by and I do hope to be back tomorrow with another post!

Deanna


Tuesday, March 28, 2017

Another Challenge

This card is for the Simon Says Wednesday Challenge - Use more than one die or stamp!

I posted this earlier and said I would be back with more details and here they are.

The Spidey image is a coloring book page I found online and printed and colored with copics (R27, R29, N1 & N3), I cut the image out and attached it with foam dots.  For the background I used the Haunted Webs die & Cityscape Nightline die both by Memory Box.  I sponged a little bit of white chalk ink on them just to give them a little bit of detail.  For the greeting I used the happy birthday dies from the Tim Holtz Celebration Words Script set.  To make the happy birthday stand out a little more I used my Wink of Stella black shimmer pen on it.  I glued all the die cut pieces on using Ranger Multi Medium Matte.


I can't wait to see what the next challenge is.  I may even get another post done before the end of the month!!!

Thanks for stopping by
Deanna

Thursday, March 23, 2017

Layer It Up!

So I have been doing lots of researching, video watching and sorting through my supplies, while I have been redoing my studio. I decided the best way to get back into my crafting habit is to try some challenges.  So I went over to Simon Says Stamp, one of my favorite shopping sites and looked at their challenge blogs (they have two).  First stop was the Monday Challenge Blog and this weeks challenge is Layer It Up!

For this challenge I thought I would use one of my favorite stamps and revisit an old design and change things up a bit.  The stamp is from the Safari Animal 2 set by Local King  and I used MFT Hybrid ink Hot Fudge to stamp it.  I colored the images with copic markers (E21, E23, E25, E29, YR23 & Y35) then I put a layer of glossy accents over the eyes.   I edged the image with versa magic jumbo java ink and distressed the edges and layered the image on 3 different layers of card stock.  I embossed the background piece with the "mesh" cuttlebug folder and used a little bit of Tim Holtz vintage photo distress ink to add a bit of an aged look to it.

For the first card I  finished it with some rhinestones and used the paper smooches "happy birthday 2" wise dies to make the greeting.  I cut the greeting out 3 times and stacked them together to make it stand out a bit.
For the second card I just layered the image on 3 layers of card stock to frame it out and centered it on the card with no greeting.  To add a little more detail a put bronze brads in each corner.


I am happy to be back in the crafting groove, I just placed another crafty goodness order from Simon Says Stamp and will post a pic when it arrives.  I can't believe how many great new products and techniques I have been finding lately.  I'm so excited to get going on my crafting again.

I got this order from Simon Says about a month ago.  I needed to get some card stock and adhesives and I couldn't resist adding some new stamps and dies as well!

This order is stuff I picked up last year from One Crazy Stamper,  I love all the matching stamps and dies! Even though I haven't posted any completed projects with these sets I have been working on making projects with these items.
I will endeavor to do another challenge this week, I may even make it to 3 posts in the same month...LOL!
Thanks for stopping by and have a great weekend everyone!
Deanna


Monday, March 13, 2017

Studio Changes!!!

So a couple of years ago I rearranged my studio and I really liked it at the time, however it wasn't working for me.  There just wasn't enough working room on the desk and I always ended up with a huge mess, (as you can see from the picture below) especially after I moved my computer to my studio desk as well. I really wanted a bigger desk and more working area and after some thought and tricky rearranging I came up with this.  I have posted some pictures at the bottom of this post of what it looked like before (I really did like it before it just wasn't practical)

AFTER

 So as you can see it still follows the same wall and fills most of it but I removed part of the second tier on one side.  I used the cubes sideways underneath and was able to extend one half of the desk out another 16"! So now I have a huge work space on one half (that is when the cats actually let me use it...they like to use it as a bed most days).  


I use this half of my desk for the computer, stamping and coloring area.  I have most of my stamps stored on shelf above desk and have just finished reorganizing them all (that took forever!).  I'm still working on labels for all the baskets & boxes!  


I also keep most of my die sets on magnetic sheets on the storage cubes and walls.  I tried storing them in boxes or pages in binders etc. but, I really need them to be out and visible.  It makes life so much easier when I'm trying to decide what to use for a project.  


For the other side of the desk I tried to keep a large working space clear!


I have my Cricut Create and cartridges here (more cartridges in box under cricut).  Two cubes store all my 12x12 cardstock, I leave my small paper trimmer on the desk so I have it close.  


 I also have all my Distress & Memento inks on this desk. The brown basket houses all my containers of current works in progress.


This smaller desk that is on the end wall provides another work station. I store my Big Shot (and embossing folders), Zutter, larger paper trimmers & my sewing machine here.  Sewing machine is under blue cover...girls won't leave it alone when it is isn't covered :)

BEFORE 


Well, it is really late and I have probably messed up this post at some point...no doubt I will have to come back tomorrow and fix it ...LOL!  Thanks for stopping by, I do have some pictures lined up for another post, maybe tomorrow!
Happy Crafting
Deanna

Monday, January 9, 2017

Well it HAS been almost a year.....

I swear, I just don't know where the time goes.  It was a very busy 2016 and I didn't get to craft nearly as much as I wanted to.  As for updating my blog...well that didn't happen. So I'm starting early in 2017 and will try to be a little more active in my posting and crafting!  Here are a few projects from 2016.

However, as I mentioned in previous posts...when I can't craft - I shop.  Here are a couple of pics of some of the goodies I bought last year.  First picture is a bunch of goodies I bought from Simon Says Stamp and the second picture is of Khali checking out the stuff I bought at Michael's.


Below are 2 cards I made using the same stamp from Kraftin kimmie Stamps ,  I will repost these later with more details about other supplies I used for these.


Went to see Batman vs Superman and got inspired to work on some projects featuring Batman, Superman and Wonder Woman.  For the Batman &
Superman items I used the cricut cartridges Batman:The Brave & the Bold & Superman.  The Wonder Woman picture is the coloring book cover that was on the Wonder Woman #48 comic.  I will post some pictures of the comic in another post.


Every now and then we find comics on the shelves that have been damaged and won't sell.  Instead of throwing them out, I have been using them for craft projects.  These I have cut up and made into magnets.  I adhere them to self adhesive magnetic sheets then I add fun details and inks and seal with mod podge.


This is a book mark I made for a book guild I am in.  I will also post this one later with more details on what I used to make it.

That's it for now!  Have a great night everyone and thanks for stopping by.
Happy Crafting & Happy New Year!
Deanna